Locks on your VW bug are pretty simple to work on. On my 1975, the door locks didn’t match the ignition lock. Since it was a used car, I only received one of each key for the vehicle. I had a blank for my ignition, but I had no blank for the door key. I needed to re-key the doors to match my ignition. Apparently, this is the way to do it, as you can not re-key the ignition even if you wanted to.

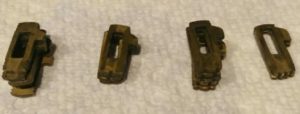
I had the good fortune of going to a swap meet this past weekend at John’s Bug Shop – a sponsor of this club. I was able to procure some used door handles. I bought 4 in total. I figured that four would provide some extra parts, since I’m working with gear that is almost 50 years old. I opened up and salvaged the components within, cleaned them up, but I’m getting head of myself here. Let’s go through how to remove them from your vehicle.
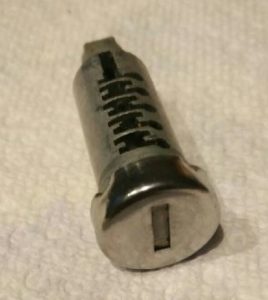
The door handles are easy to remove from the car, simply by removing a single screw, that is sort-of buried behind the rubber weatherstrip on the door. After the screw is removed, you can push the handle towards the front of the car, and pull the rear of the handle free. Once the handles are free from the vehicle, the fun can begin. On the back of the handle there is a screw, sometimes it’s a Phillips, or a slot headed. As you remove this screw, the eccentric will become free and the torsion spring behind it may want to take off. Careful work will avoid this. Wiggle the eccentric free, and grab the now free spring and put these three pieces aside.
At this point, if you have a key for your lock, insert it as it will prevent the tumblers and springs flying free when you slide the lock cylinder from the handle.
If your handles are anything like mine, that’s really not going to happen. They will be so caked up with old grease, dirt and dust, they won’t do much at all. Pull the key out slowly and catch anything that explodes. If they don’t fly off in every direction, then use your pocket knife to remove the tumblers and springs. There are nine of each in the bore of each handle for my vehicle.
The tumblers are interesting. There are only four “sizes” depending on the depth of the cuts on your key. I sorted all my tumblers by size, and then strung them on four separate pieces of mechanics wire.
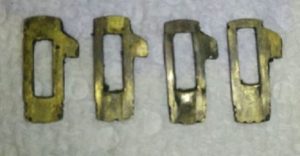
You can also thread the springs onto a length of mechanics wire. I did this for the tumblers and springs so I didn’t loose them. I was able to clean all the parts including the lock bore with some parts cleaner. Watch for damaged or broken springs. They will have coil loops that have broken or will be otherwise misshapen. Use good springs for reassembly.
Re-installation is a bit of a guessing game. Place a spring in the cylinder, closest to the chrome end. Try one of the four sizes of tumblers. Insert your key and see if the tumbler sits flush with the edge of the cylinder. Did you get it right? Look on the bright side, you can only be wrong two more times if that one was incorrect. If you were successful, repeat the process 8 more times for that handle.
If you have had success in re-keying one of your door handles, you can disassemble it again and make note of the tumblers for your second handle. Reassemble the tumblers into the bore with a little lightweight grease, I used thin white lithium. Wrestle with the spring and fasten the eccentric with the screw. At this point, you can test your handiwork! If all is good, putting them back on the car is almost as easy as the removal, but it takes a little bit of finesse to wrangle the seals onto the handles so they stay in the right place.
At this point you should have a single key working for your ignition and doors. Pat yourself on the back for a job well done!