Here is a story about a failed wiper motor assembly. There is a common failure on these assemblies, but this isn’t a story about a common failure.
In my experience, there is a general reason that the windshield wiper motor does not run, which can generally be attributed to corrosion in a wiper arm shaft. This causes the motor to stall and not operate.
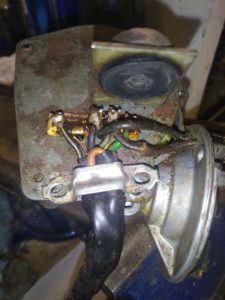
I was in a bit of a hurry to test this, so I removed the assembly from its home location in the cowl and relocated it into the trunk for testing, while being careful of the exposed electrical connections. Then I detached the motor from the transmission. When I turned on the wiper switch, the only thing that happened was the motor got warm. From this it was pretty clear the issue was internal to the motor or the drive gear assembly. My bet was on the motor.
I removed the drive gear from the motor. This isn’t for the faint at heart. What I didn’t know is there are two nuts that can fall out, and go anywhere. Don’t do this. (more on this later)
When I removed the permanent magnet pole housing (I’m going to call it the “can”), the problem was pretty obvious. The permanent magnet inside the can had began to shale due to corrosion, and the windings themselves showed signs of corrosion. For me, my motor was irreparably damaged with corrosion. This is likely due to water penetration, through the cowl, down the wiper shaft onto the motor assembly.
The next problem was sourcing a motor. I figured I could connect with some friends to get this job done on the cheap, and someone would help me out. It turns out that these used parts are getting somewhat scarce. Aftermarket is pretty pricey for this… and since this was a bit of an unexpected budget buster, I needed to think a bit harder.
Late model Super Beetles and Standard Beetles assemblies are quite a bit different in appearance. The transmission arms are quite a bit longer, and the cam/motor assembly is 180 degrees from what you might be hoping for. All is not lost however, let me confirm that the motor is identical on the two units, sans the drive gear assembly.
 Follow the wire harness to the disconnection point behind the speedometer. They are all colour matched from the wiper assembly to the vehicle side. If you feel more comfortable, make your own labels to ensure you get the wires back together the same way. Remove the wiper assembly in its entirety from the vehicle, and put it in your bench vise. Remove the motor from the wiper transmission. Make note of the colour codes for the solder terminal connection on the top of the motor. Now, remove the two center wires from the connection plate. You will also notice that these two wires that go into the motor. The insulation on these will be brittle. This will cause a short circuit, and leave you with no wipers when you need them. You will need to replace this insulation with some heat shrink or new wire. Electrical tape won’t work, as the aperture to pass the wires into the motor can is somewhat small. At this point, remove the screws from the motor can and catch the nuts as they fall. My trick here, was to use a couple of strong rare earth magnets to firmly hold the nuts where they belong. When you pull back the can, the armature/commutator assembly will generally stay with the can, due to the permanent magnets in the can. Something to watch for, there is a nylon bushing/bearing on the end of the armature, but sometimes it will remain buried in the grease in the bottom of the can. There is another bushing at the “screw” end as well, mind that one too. It will likely be stuck in the grease at the cam screw end. Adjacent to this, there is a nylon screw adjustment that controls the motor end play. Back this off a couple of turns, since your new parts may have a slightly different tolerance.
I replaced the armature assembly by introducing the armature screw shaft into the drive gear assembly as I lifted the brushes over the commutator. Once all three brushes have been raised on top of the commutator surface, push the armature fully into the drive gear assembly. For the armature bushing on both ends, I used some sticky grease and stuck them to each end of the motor shaft. Feel free to refresh the nearly petrified grease in the motor can. Now I used a large screwdriver to maintain pressure from the armature screw towards the drive gear. Effectively you are locking the armature in place. If you don’t do this, your armature will fly into the motor can due to the permanent magnets in the can, pulling the commutator away from the brushes. This is the fussy part. You will need to do this more than once ’till you get it right. Since the rare earth magnets are holding the nuts still in place, you can fasten the screws from the can to the drive gear housing quickly
Now that the armature is in place you can adjust the end play between .008″ to .012″. Clean up, inspect and grease the drive gear and driveshaft. Replace the drive gear cover. Re-solder your connections on the connection strip. You will need to reset “Parked” position. I managed to do it on the bench, incorrectly, so I would recommend that you loosen/remove the drive crank so you can do a park reset, in the vehicle.
 Clean up the wiper transmission. I used the wire wheel and glass bead blaster. Apply some paint to the transmission, the permanent magnet. Run a fresh band or two of tape around the end permanent magnet can. Apply fresh light grease on all the pivots and ensure the wiper shafts run free and have no corrosion on the shaft surface.
To ensure the water damage doesn’t occur again, I needed to replace the rubber grommet for the wiper shaft. Since my project car will never be a show car, I opted for some generic rubber grommets that I sourced at Lowes from their hardware “Bin” selection. I also needed to source some washers for the shafts, as some of my original hardware was missing. Again, this probably was the original issue. Effectively I used Washer|Rubber Washer|Body Cowl|Rubber Washer| Washer| Nut from the inside to outside.
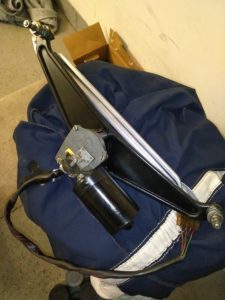
When you are done, this should be what it looks like. (see picture, left – prior to installation)
You will need to reset park position, and tighten the drive crank. I figure with this rebuild, and the use that this car now gets, it should likely last a lifetime.
(Note: this was my experience , but please perform your own assessment and repair as required)