So – this weeks article is a pretty basic repair, but pretty much necessary these days on the older Standard Beetles and early Super Beetles. The original glove boxes are made with a paper fiber material that hasn’t held up well over the years. On my Beetle, staying original isn’t all that important. More important to me, is the car being functional.

Aftermarket glove boxes do exist, and are typically injection molded plastic. There are a few types that exist. Some offer the ability to create a hidden location for an aftermarket stereo system . This is a bit of a classy way to have a stock looking dash, but have great sounding tunes in your bug. The other style is simply a plastic replica of the paper fiber original. That’s what I installed in my 1975 Standard Beetle. These are available from our sponsors – John’s Bug Shop and CIP1.ca. They come ready to go for 1969 to 1977 flat dash cars, with the trunk release in the glove box. Dealing with this trunk release is a bit of a pain. The cable must be removed from the lock assembly at the front of the car.
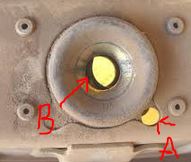
At this point, don’t close the hood, or there is a chance you will not be able to open your hood again (without major surgery). It’s a Phillips screw you can access from the access port on the latch. (A on the image above) You must also remove the cable from the mount point adjacent to the glovebox, with another Phillips screw. You should now be able to remove the strap around the glove box. This should be an 8mm head on a screw. The old glovebox should come free at this point. You can use a drill to remove the two rivets. Now the release handle should be free. You can take the opportunity to grease the cable. On the new glove box there are three holes pre-drilled in the plastic to accept the unlock handle.
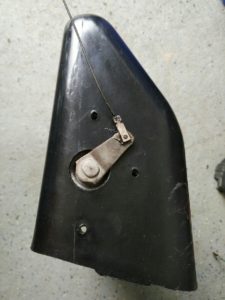
If you are following along, there are two rivets and one screw. This is on purpose, as the screw is used to mount the new glovebox to a bracket which will stabilize the glovebox in the opening, especially when operating the release lever.
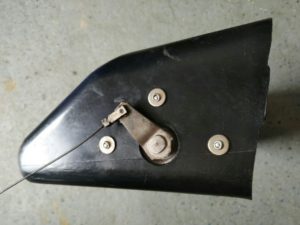
Don’t do as I’ve done in the picture, I’ve totally missed the need for the bracket. I’m about to find out when I install the glove box into the opening and try to operate the release lever. The rivet closest to the glove box door shouldn’t be installed.
I also used some foam weatherstrip material to pad the back of the glovebox strap to put a little more pressure on the glovebox in the opening to make for a nice tight fit.
So – it’s about at this point I get things all set to try operating the release lever and I find out the whole glovebox moves when I do this. I then realize that the screw and the bracket are required to keep the glovebox from floating about. After removing the superfluous rivet, and using the screw and bracket the assembly seems to work correctly.
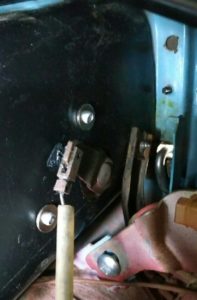
Now fasten the cable to the lock assembly at the front of the car. The cable can be threaded through the eye and the set screw tightly fastened. Again, if the cable slips, it will be nearly impossible to release the trunk. Don’t forget to attach the cable sheath near the glovebox as well. Have a helper operate the release in the glovebox, so you can visually confirm the second stage lock on the lock assembly opens fully. If it does not open fully, take the time to adjust the cable until it does open fully and correctly.
You can see in this example, if the release was fully depressed in the glove box, the secondary lock would still be engaged. This opening must be “round” if you have the release depressed, or the hood will be become permanently locked. Adjust the cable appropriately.
If you are feeling lucky, punk – you can test your second stage lock now, and hopefully you can open the trunk. If you can’t, I can assure you that you won’t like the method in the Bentley book for resolving this issue.
That’s about it, now my glove box is functional again and won’t deteriorate like the paper style of glove box.