When I bought my bug, I expected some electrical issues. I’ve had a few. From issues with my headlights to some issues with basic grounds. You can come to expect these kinds of things on cars approaching 45 or more years old.
Another issue I encountered on my own beetle was an intermittent starter issue. In this post, I’ll break down how the starter system works electrically and mechanically since this topic has come up a few times with a few friends in recent days.
The starter system on most older cars is quite similar, but I will explain how it works on a VW, and how it relates to issues you might be experiencing.
Components of the Starter System:
-
- Starter Motor
- Starter Solenoid
- Battery
- Key Switch
- Wiring
On a VW, the starter motor and the starter solenoid is an integrated device. Here is a picture for reference:
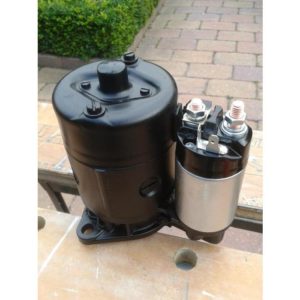
You will see two cylinder looking parts on the starter. The larger one is the starter motor, and the smaller one is the solenoid device. The solenoid’s purpose is two fold, it is a mechanical engagement device and also an electrical switch.
Here is how it works:
-
-
- It takes a low-current 12 volt signal from the ignition key switch (start position), and becomes an electro-magnet. (you remember these from science class – the battery with wires wrapped around a nail)
- This electo-magnetic field then causes the solenoid armature to contract.
- One end of the armature is a high-current electrical switch. That’s the terminal end with the nut and spade connector.
- The other end of the armature is a mechanical engagement device that pushes the starter motor gear into the ring gear on the flywheel.
-
Seems a little complicated, but broken down to the individual steps, it’s a bit easier to understand what the “Black Box” does.
When people say “My Car Won’t Start!” – that can mean a lot of things. Listening is the key to diagnosing what subsystem is preventing the car from starting. Since this article is focused on the starter, we are going to discuss starter related topics, and common issues around the starter.
On my Bug, I was having an intermittent start situation. When the starter worked, it worked well. The engine would rotate at a good rate, before engine ignition. When it didn’t work, nothing would happen with the starter. No sound. Nothing! This was a hint to what was going on.
An issue that is becoming more common with our older vehicles is copper wire that has gone high resistance due to corrosion, sometimes more pronounced with heat. Somehow the PVC jacket on the wire has become compromised, and corrosion has set in. This can manifest itself on any circuit, such as dim headlights or tail lights, but we tend to ignore the lighting issues. Lighting doesn’t prevent the car from starting. Low voltage to the starter solenoid will prevent the car from starting however.
So, on one of those “Nothing Happening” days – I tried to catch it in the act, to understand what was happening. I used a multimeter (aka Volt-Ohm Meter or VOM). I turned the meter to the volt range and confirmed the battery voltage under the back seat. I simply put the red probe on battery(+) and the black probe on battery (-). It probably said 13.0 to 13.5 Volts. This confirmed my meter was working, and the battery had an acceptable charge. I then confirmed the parking brake was set and the transmission was in neutral. I rolled under the back of the car and cleaned some metal on the starter or engine for the black probe for (-), and placed the red probe (+) on the small terminal (from the key switch). Have an assistant turn the key to the start position. Measure this voltage. You should see at least 12 Volts on this small wire. If you do not, this is an indication there is an issue with this circuit. When I measured mine, I had around 6-7 volts. If you think back to how the solenoid works, there would be not enough voltage or current to operate the electromagnet. The starter would not engage, nor would the heavy current switch operate, thus the starter motor would not spin to start the car engine.
I traced the small solenoid wire back to the keyswitch. It goes from the starter, through the rear of the left floor pan to a connector under the back seat. This connector can be opened up and inspected. You may find that this connection is loose, corroded, painted or otherwise causing a connection issue. Clean it up well, and/or replace the connectors. You can also put your meter on this junction as well, to see if the wiring issue is upstream or downstream of this point. If it’s upstream, the next junction is behind the dash, in the trunk.
You will be able to see where the keyswitch wiring goes from under the dash (where your knees go), to behind the dash (trunk) and look for the disconnect. Again, with your meter, confirm that you get 12-ish volts. (not 6 or 7 volts).
In my circumstance, I was reliably getting 12-ish volts at the switch, so I then knew my wiring in the harness was somehow compromised. I simply ran a new wire from the behind the dash area to the starter. Complete, non-interrupted. I fastened my new wire to the existing factory harness with some tie-wraps. Black tape would work here too. I installed appropriate crimp on terminals and confirmed back at the starter end that I had 12 or more volts. I haven’t had an issue since.
Other people have different ways of solving this issue. Some will add a relay circuit to mitigate the low-voltage coming from the keyswitch, but I think it’s a better idea to actually fix the root cause with a new wire instead of using a band-aid fix.
Another common starter related malady is a worn starter bushing. The starter bushing provides support (as a bearing surface) to the starter pinion. With a worn bushing, the starter will not engage smoothly to the ring-gear on the flywheel. It’s trivial to replace these when the engine is out of the car. A drift and a hammer will knock them out with ease, but when you don’t want to pull your engine – what can you do. Find a tap just slightly larger then the inside diameter and cut some threads into the bushing. You can now pull out the tap and the bushing cleanly from the transmission through the starter flange. Lightly grease and tap a new one home.
I’ll also offer a warning too, if you are messing with your starter. Before you go any further, disconnect the ground strap on the battery. Got it? Good! Next, there is a large heavy gauge connection that runs to the positive (+) terminal of your battery. This terminal on the solenoid uses a 13MM (wrench) (8MM threads). These can become horribly seized. Brute force with a wrench will destroy the bakelite cap on the solenoid. It doesn’t take much! Don’t break it!!! If the connection is stuck, you are further ahead to use a Dremel with a cutting disc attachment to cut the nut as so it can be removed. Take care not to damage the terminal stud threads. (don’t forget your safety glasses). For reassembly, a new 8×1.25 nut with washer can be used with lots of anti-seize compound or grease to ensure you can remove this without force in the future. Put some fresh paint on your starter tool!
When your starter is dying one thing that may happen is another type of intermittent start. This failure will cause an audible “CLICK” (that’s the solenoid), but the starter motor will not run. Its caused by a stuck electric motor brush, worn brush, or dead segment on the motor commutator. You may find a gentle tap or two with a hammer on the big side of the starter may limp you along until you can replace the starter motor.
These suggestions and tips should start you on your way to having a reliable air cooled VW!