Ok, this seems like this will be a simplistic article. It sort-of is, everything is basic, but you need to be very conscious and meticulous to prevent trouble from finding you. There are a few nuances about doing an oil change on your air-cooled engine that you may or not be aware of, things that I have noticed while working on the air cooled wonder. Perhaps I’m too picky about how to do simple things. The devil is usually in the details.
Everyone complains or makes fun of how VW’s leak oil, or as some say – “mark their territory”. I suppose on older engines it’s possible to weap oil from a location that isn’t very serviceable, but lets at least deal with the leaks from the serviceable locations. This is important, as the beetle engine is oil cooled (by air), just as much as it is air cooled (directly). It is vital for the oil to be at the correct level (checked when the vehicle is on a level surface) in order to lubricate and cool the engine effectively. It makes for poor maintenance to have oil running out the bottom of the engine.
I’d recommend doing this work in the off season, like in the spring before you bring your bug out. This may take a week or two to do properly.
Start and warm up your engine, let it warm up well, as warm oil flows out of an engine better and more completely than cold oil. I let mine idle while I had some lunch. When it’s good and warm, shut it down and get ready to drop the oil out.
When doing an oil change, the first thing to do is to have all the required tools and parts for doing a proper oil change.
Parts
- Oil
- Sump Gasket kit (including copper washers)
- Parts cleaner for the sump screen and sump plate
Tools
- Hammer
- 1/4 Drive Ratchet
- 10 mm socket
- vice grips (depending on damage done before you got here…)
- drain pan to collect waste oil for recycle
- Shop towels / paper towels
Whats a sump screen? Don’t fool yourself into believing it’s an oil filter. The mesh screen is about the farthest thing from an oil filter. It would be only appropriate to filter out large debris, but if you had large debris in your engine, yikes! The air-cooled engine does not have a factory installed spin-on oil filter setup either. Remember, the bug was designed in the mid-1930’s and such technology wasn’t widely used yet. It wasn’t until 1946 that the paper pleated oil filter became available. The success of the beetle powerplant showed that it wasn’t really even needed anyway. The sump screen was designed in a way so that the oil pick-up tube would only stick part-way into the sump and the dirty, sometimes containing metal fragments oil, would collect at the very bottom of the engine between sump plate and the screen. Gravity helped out here!
Other parts you may need, depending on the condition of your sump area:
- sump plate
- new 6mm acorn nuts (if required)
- new original studs 6mmx1.0x23mm (I think the originals were 21mm long, but 23 seem to be commonly available and work just fine.)
- new step studs 6mmx1.0 to 7mm or 8mm
- Red “Permanent” thread-lock liquid (i.e. loctite)
Why would you need a new sump plate? Most of the time you don’t. The original equipment ones are just fine after a repair. They become dished upwards. This destroys the flat gasket mating surface, causing an oil leak. The repair required is using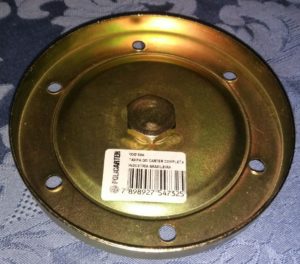 your hammer to “flatten” the holes. Some mullet-head over torqued the poor little 6mm hardware and distorted the sump plate. Don’t expect a new sump plate to be without flaws either. Here is an example from cip1.ca, VWC-113-115-181-A. There are no fewer than 8 defects with the part I received. Wait, What!? I don’t think I’m being too picky here, but I will give the vendor the benefit of the doubt on one of the defects.
Defects 1 to 6, the condition of the outer ring of holes through the stamping. 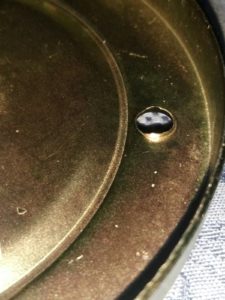 The die used in manufacturing was so dull, it tore a hole through the plate, rather than cutting. If you don’t believe me, here is a close up. All 6 of the outer holes are like this. The premise of this article was an oil change and preventing leaks. I assure you, this would cause a leak.
Defect 7 is the spot weld on the centre bolt where the washer would rest. Here is a close up of that area (left). There is a burr here that the spot welder left behind. (about 2 o-clock from the big hole) This may not cause a leak, but it’s poor quality.
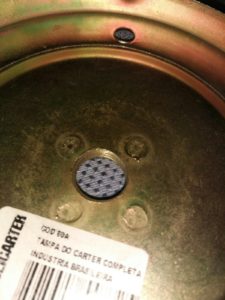
The most laughable defect here is the centre drain plug bolt. To cip1.ca’s credit, they indicated that there was not one included, and I should purchase my own if needed, which I did. I selected VWC-113-115-193, and it seems great! However, the drain plate did include a drain plug bolt, that has a bit of an issue.
The sump screen is supposed to sit flush on a gasket, on the top of the sump plate. There is 3/8ths of an inch gap here. There is no gasket that will help you here. The other drain plug I ordered seems much more reasonable and allows the sump screen to sit flush on the top of the sump plate.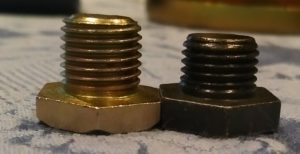
In order to use my new sump plate, I will need to gently modify it removing the burrs from the stamping, and the spot welded area. Where is my Dremel tool anyway?
Another thing that I should mention – chrome looks cool, but it leaks if not properly prepared. The gasket surface should be completely clear of chrome. Use some fine grit emery cloth to remove the chrome if you select a chrome sump plate. Be wary of the really cool new aluminum ones as well. They may require replacement of all your sump studs (danger danger – #6 is a bugger), as the aluminum thickness may cause you an issue with gaskets and fastening hardware. Your mileage may vary!
Gasket sealing compound is not generally required, but in special cases may be. I leave that decision up to you if you have a special need for it.
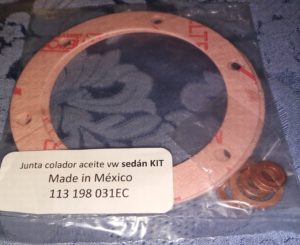
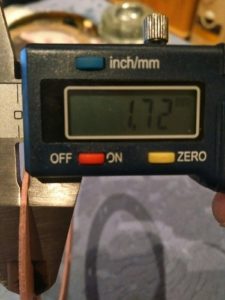
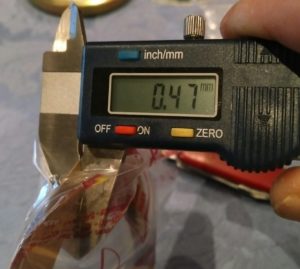
Remember the mullet-head I mentioned earlier? He may have damaged the studs that hold the sump plate to the engine. The good news is these can be repaired. There are a couple of techniques based on the damage done. If the acorn nuts are just worn out, simply replace them with new acorn nuts. You may ask why not use just a standard open face nut? Oil may wick its way down the studs through the threads, and present as an oil drip at the end of the stud. Don’t do it! If it’s just the threads for the acorn nuts on the old studs that are mangled, the old studs can be removed except for one – thats the one that holds the oil pick up tube in place on later model engines. Thats the one at the front of the engine (front is towards the front of the car). Don’t mess with that one if you can avoid it!! The engine is a very soft metal (magnesium), which is quite fragile and prone to thread damage in the magnesium. Using the vice grips you can clamp them on the studs and gently unwind them from the engine, being careful to treat the threads in the magnesium crankcase very gently. With the five studs now removed (remember – don’t touch that last one!), you can use some parts cleaner to clean the oil out of threads in the crank case. This is why this job should be done over a week or two span, so the engine completely is void of oil allowing you to clean these threads and prepare them for new studs with permanent liquid thread lock applied. I used the stud for my oil pick up tube as my gauge of how long the studs should protrude out of the engine. Mine measured 11.3mm I encourage you to do your own measurement, perhaps with the sump plate, screen, gaskets,copper washers and acorn nuts you plan to use, and allow for some crush within the gaskets. I’ve decided to go with the Mexican style gasket which is more than 3 times as thick as the EMPI gaskets. I think 11.3mm is about right for me. If the studs protrude too far out of the engine, they will bottom out inside the acorn nuts, and you will not be able to tighten your sump plate correctly, and you will have an oil leak.
Here are the Mexican gaskets which I got from cip1.ca (VWC-113-198-031-10) versus Brazilian (EMPI) sump kits (which I already had). The Mexican ones are fantastic in my opinion, but may not work well if your studs are very short.
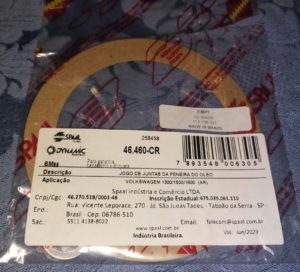
There is quite a difference in the gasket thickness:
The hardware is even different:

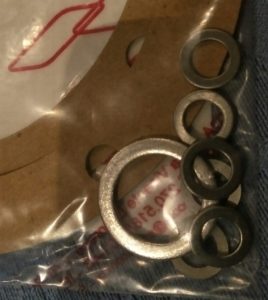
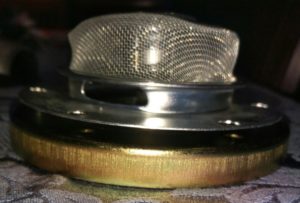
Obviously in the package, there are two paper gaskets. Ensure that one of these are on each side of the sump screen. Also make sure there is no “extra” paper gaskets stuck anywhere, like on the bottom of your engine block, or on the sump plate.
Now, if your mullet-head has really done some damage, and the threads are stripped out of the crank case, don’t loose hope. Step studs to the rescue.
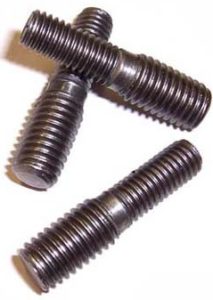
Step studs allow you to drill and (metric) tap to the next size of threads in the engine, but allow the use of your un-modified sump plate, screen and gaskets. When done right, it’s an invisible repair. Different sizes of step-studs are available, but I would go with 7mm to 6mm step as a first repair, and if those become damaged, you can always as a last resort use 8mm to 6mm step studs. Be forewarned that there is not much material left for strength left in the sump area, so try to use the 7mm’s as a first repair. You can lock (jam) two open face nuts together on your replacement stud. Apply permanent liquid thread lock and wind them into the block, setting at the correct depth. It should take about 24 hours for the thread lock to harden completely.
When reinstalling the new/refurbished sump hardware, be sure that you don’t become the mullet-head. Use the 1/4 drive ratchet only in the palm of your hand as not to apply too much torque. The internet says 5 ft lbs. Thats not much! You can tighten that up with your pinky finger!
As for oil, I don’t really want to start a holy war. You can pick your oil, and I will pick my oil. I’m using Collector Automobile Motor Oil as I think that is pretty cheap insurance to keep my engine together just a bit longer. It’s formulated with with ZDDP, which is an anti-wear agent. This is somewhat important to use even on a fully broken-in engine, since we only use them seasonally, offers some residual protection to the lifters and cam-lobes on seasonal startup. Our sponsor Johns Bug Shop carries it.
A complete oil fill for my bug (according to the 1975 owners manual) is exactly 2.5 litres. For our expected weather for the summer, Volkswagen also recommends a higher viscosity oil than some folks expect. (read: DON’T USE 10W30) Here is the chart for my 1975 engine:
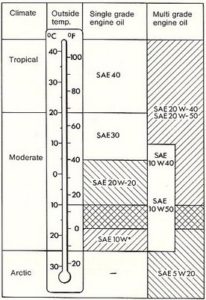
Given the season in southern Ontario, 10W40, 15W40 or 20W50 are probably good selections.
If you take the appropriate precautions and preparations as discussed above, you can be sure that you will have no oil leaks around your sump. While you are doing your final inspection, and subsequent inspections, keep an eye out for other leaks such as push-rod tubes, valve cover gaskets, or from the transmission bell housing (main seal). You will be on your way to preventing those drippy spots on your driveway and in your garage.
Update: 14 APR 2018
One of our club members made an interesting point regarding how oil viscosities over the years had changed as prescribed by VW. Here is a manual excerpt from 1960. Something to keep in mind for your specific model year.