This is part 2 of an ongoing article on some work I’ve been doing on a replacement front end for my 1975 bug. In part 1 , about a month ago, I suggested we were having an early spring. That hasn’t really worked out well, but the rest of the project has been going ok, despite my poor weather prognostication skills.
Last time I mentioned that the steering limit bracket was missing on my new-to-me beam. I was going to have to salvage, refurbish and fit the bracket from the old beam to the new beam. That happened.
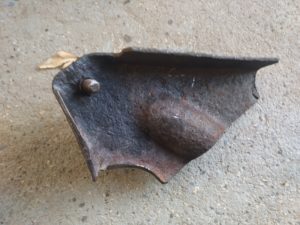
The captive nut, and the threaded sheet metal were then chased with a 8mm tap to clean up the threads. I then fit the steering box in place on the rack, and then positioned the bracket in place, so the pitman arm would contact the adjusters on the bracket for each left and right extent.
I then clamped the bracket as well as I could, which wasn’t real easy. I removed the steering box again, so I would have better clearance while welding. I then brought out the mig. A couple of beads later it’s clear I’m not a fantastic welder, but I’m going to chock this up to more practice needed. I then cleaned up the messy welds with my angle grinder, and the less messy welds were just simply wire brushed to look acceptable.
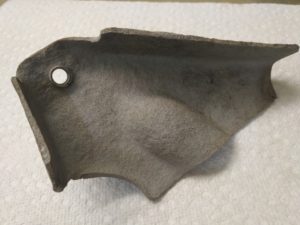
The next part of the work was to protect the bare metal I had exposed on the front end components. In part 1 of this series I mentioned that I had selected POR-15 to protect the components. Not sure exactly why I went this direction, perhaps that’s what the cool kids were doing. I do not regret the decision one bit. I’m very happy with the products, how they applied, and how they work. Apparently, according to the literature, POR-15 gets harder when damp/wet which is quite the opposite to paint.

The cleaner degreaser can be mixed with 10 parts hot water 1 part cleaner degreaser. I simply wiped down all the parts with this solution and a clean rag and rinsed with water when done. I highly recommend the rubber gloves for this part unless you would like to look like a lizard man for a few days….say…..
The next step is the metal prep when applied and rinsed away leaves behind a zinc phosphate coating. This is the ideal primer for POR-15 to adhere to. It’s best to use this when you have bare metal. If you are applying POR-15 directly over rust, this isn’t required. I used the paint brush for this step, as it allowed me to push the coating into voids and crevasses . Wear the rubber gloves here too…
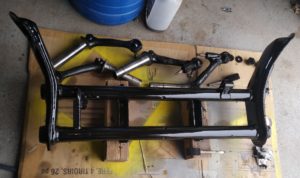
The last step is the POR-15 product. Wear the rubber gloves. This stuff doesn’t come off your car parts or your skin! It applies in a paint-like manner, perhaps a little thin and runny. You need to be careful of the application, as if you apply too much, it will run and sag when you look away. If you manage to see a run or a sag, it is possible to pull the run out by using your brush without causing harm. Speaking of brush, I used a 1″ foam brush for this job. As the product dries, despite being applied with a foam brush, it comes to a wonderful hard protective shine. The manufacturer suggests a second coat when “drag dry”, or if you need to do a second coat at later time, then do a fine 400 grit scratch before applying the next coat.
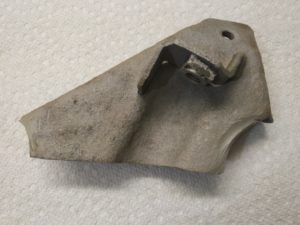
I’ve applied my second coat now, and I can say a few more things.
- It goes on just as smooth and still has the tendency to run.
- POR-15 has a large coverage area for such a small can (I have been able to complete my entire front end sans backing plates and tie-rods with two coats from the small half-pint can)
- It’s tough. You can see from the picture above I had the beam sitting up on 4×4 blocks. I had some POR-15 drips run through the mounting bolt holes. I had 4×4’s stuck to my front beam for a while!
- It looks great!
- When re-capping the can, a tip from the manufacturer – place plastic wrap around the lid so the lid doesn’t weld itself to the can.
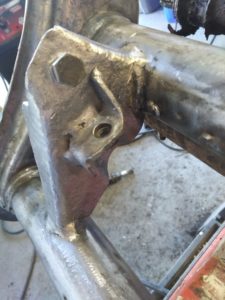
The manufacturer of POR-15 recommends to top-coat the finish with traditional paint, as this finish will react (aesthetically only) to ultra-violet light.
Thats where I am right now, I need to start my top coat and get my hardware all together.
I’ll report on part 3 of this article when I remove and replace the beam in my bug.